jTable is a very popular jquery HTML table plugin. I got a request about jtable with PHP and MySQL integration. This tutorial help to understand what is jTable and how to use it with PHP and MySQL.
jTable is a table plugin that creates an HTML table and loads records from the server using AJAX. The table supports main CRUD features like adding a record, editing a record, and deleting a record. I will extend this functionality and integrate it with PHP and MySQL.
The main features of jTable are as follows
- Automatically creates HTML table and loads records from server using AJAX.
- Creates ‘create new record’ jQueryUI dialog form. When a user creates a record, it sends data to the server using AJAX and adds the same record to the table in the page.
- Creates ‘edit record’ jQueryUI dialog form. When a user edits a record, it updates the server using AJAX and updates all cells on the table in the page.
- Allow user to ‘delete a record by jQueryUI dialog-based confirmation. When a user deletes a record, it deletes the record from the server using AJAX and deletes the record from the table on the page.
- Shows animations for create/delete/edit operations on the table.
- Supports server-side paging using AJAX.
- Supports server-side sorting using AJAX.
- Supports master/child tables.
- Allows users to select rows.
- Allows users to resize columns.
- Allows the user to show/hide columns.
- Exposes some events to enable validation with forms.
- It can be localized easily.
- All styling of table and forms are defined in a CSS file, so you can easily change the style of everything to use plugins in your pages. The CSS file is well defined and commented.
- It comes with pre-defined color themes.
- It is not dependent on any server-side technology.
- It is platform-independent and works on all common browsers.
We are using the below Files, The details are:
Index.php - This file will responsible to create HTML and instance jtable using jquery code.
response.php – This file is responsible to create database connection strings and convert records into JSON strings and returning data as a response.
connection.php – This file is responsible to create a MySQL database connection.
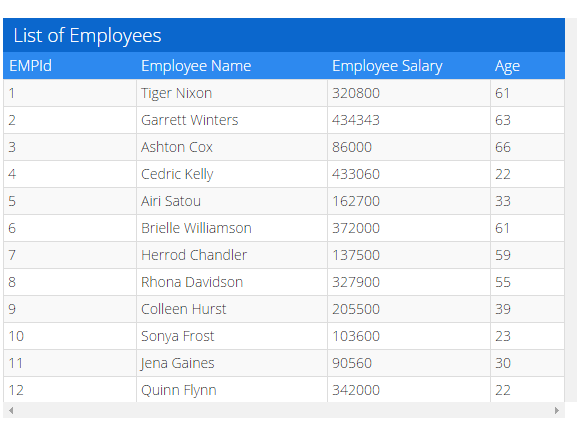
Simple Example of jTable with PHP and MySQL
Step 1: Include js and css file into a section of index.php file.
<script src="dist/jquery-1.11.1.min.js"></script>
<script src="https://code.jquery.com/ui/1.11.3/jquery-ui.min.js" integrity="sha256-xI/qyl9vpwWFOXz7+x/9WkG5j/SVnSw21viy8fWwbeE=" crossorigin="anonymous"></script>
<!-- Include one of jTable styles. -->

<!-- Include jTable script file. -->
<script src="dist/jquery.jtable.min.js" type="text/javascript"></script>
Step 2: Create a connection file connection.php and define the database variable and connect with the MySQL database.
<?php
Class dbObj{
  /* Database connection start */
  var $servername = "localhost";
  var $username = "root";
  var $password = "";
  var $dbname = "test";
  var $conn;
  function getConnstring() {
    $con = mysqli_connect($this->servername, $this->username, $this->password, $this->dbname) or die("Connection failed: " . mysqli_connect_error());

    /* check connection */
    if (mysqli_connect_errno()) {
      printf("Connect failed: %s\n", mysqli_connect_error());
      exit();
    } else {
      $this->conn = $con;
    }
    return $this->conn;
  }
}

?>
Step 3: Create response.php file and fetch records from MySQL database and passed records JSON object to jTable instance.
<?php
//include connection file
include("connection.php");
$db = new dbObj();
$connString = $db--->getConnstring();
$params = $_REQUEST;
$action = $params['action'] !='' ? $params['action'] : '';
$empCls = new Employee($connString);
switch($action) {
case 'list':
$empCls->getEmployees();
break;
default:
return;
}
class Employee {
protected $conn;
protected $data = array();
function __construct($connString) {
$this->conn = $connString;
}
function getEmployees() {
$data = array();
$sql = "SELECT * FROM `employee` ";
$queryRecords = mysqli_query($this->conn, $sql) or die("error to fetch employees data");
while( $row = mysqli_fetch_assoc($queryRecords) ) {
$data[] = $row;
//echo "<pre>";print_R($data);die;
}
$json_data = array(
"Result" => 'OK',
"Records" => $data // total data array
);
echo json_encode($json_data); // send data as json format*/
}
}Step 4: Now we have JSON format of records and will use into jTable instance, So we will instantiate jTable on div id 'employee_grid' and define jtable parameters for the grid.
$( document ).ready(function() {
  $('#employee_grid').jtable({
            title: 'List of Employees',
            actions: {
                listAction: 'response.php?action=list'
            },
            fields: {
                id: {
                    title: 'EMPId',
                    width: '10%',
                    edit: false
                },
                employee_name: {
                    title: 'Employee Name',
                    width: '40%'
                },
                employee_salary: {
                    title: 'Employee Salary',
                    width: '20%'
                },
                employee_age: {
                    title: 'Age',
                    width: '30%'
                }
            }
        });
    $('#employee_grid').jtable('load');
});
Here, I have applied jTable method on employee_grid div and defined all options here, I have added a response file with listAction property.
We have used jtable('load') method for auto load data from response.php file.
You can download the source code and Demo from the below link.
Conclusion :
We have learned about the basics of jTable jquery table plugin with options. We have integrated jTable jquery grid plugin with PHP and MySQL and display records into jtable grid. I have left add/edit and delete functionality for the next tutorial about jTable with server-side using PHP and MySQL.